Step-by-step instructions for a lofted shed

Constructing a Lofted Shed: A Comprehensive Guide

This document provides a detailed, step-by-step guide for constructing a lofted shed. The instructions are designed for individuals with basic carpentry skills and access to appropriate tools. Safety precautions should be prioritized throughout the entire construction process. Always consult local building codes and regulations before commencing any construction project.

Phase 1: Planning and Preparation

1.1 Site Selection and Preparation

The initial step involves meticulous site selection. Consider factors such as accessibility, proximity to utilities (if required), drainage, and sun exposure. The chosen location should be level and free from obstructions. Clear the area of vegetation, debris, and any potential hazards. Mark the shed's perimeter using stakes and string to ensure accurate dimensions. Compaction of the ground may be necessary for a stable foundation, depending on soil conditions.

1.2 Design and Materials

Determine the dimensions of your lofted shed, taking into account intended storage needs and available space. Detailed plans, including precise measurements for all components, are crucial. These plans should account for the shed's overall height, the height of the loft area, and the dimensions of the walls, roof, and floor. Choose appropriate materials, considering factors like durability, cost, and aesthetic preferences. Common choices include pressure-treated lumber for the framework, plywood for sheathing, and asphalt shingles for roofing. Ensure you have sufficient quantities of all necessary materials before commencing construction.

Material List Example (adjust based on your specific design):

  • Pressure-treated lumber (4x4 posts, 2x4 framing, 2x6 rafters)
  • Plywood (for sheathing, flooring, and loft floor)
  • Asphalt shingles
  • Concrete blocks or pier footings (for foundation)
  • Nails, screws, and other fasteners
  • Exterior-grade paint or stain (optional)
  • Door and window materials
  • Hardware (hinges, handles, locks)

1.3 Obtaining Permits and Inspections

Check with your local authorities to determine whether building permits are required for your shed project. Submit all necessary documentation and obtain the required permits before initiating any construction activities. Schedule inspections at designated stages of the construction process to ensure compliance with building codes and regulations. Failure to comply with these regulations can result in penalties or even demolition.

Phase 2: Foundation Construction

2.1 Foundation Preparation

The foundation is critical for the structural integrity of your shed. Prepare the site by excavating holes for the foundation supports (concrete piers or concrete footings) according to your plans. The depth and spacing of these supports will depend on local soil conditions and the shed's size. Ensure the holes are level and properly sized to accommodate the chosen foundation type.

2.2 Pouring the Foundation

Place the foundation supports (concrete piers or blocks) within the excavated holes. Ensure they are level and plumb. For concrete piers, follow the manufacturer's instructions for mixing and pouring the concrete. Allow sufficient time for the concrete to cure completely before proceeding to the next phase. This curing time typically ranges from 24 to 72 hours, depending on weather conditions.

Phase 3: Frame Construction

3.1 Floor Framing

Construct the floor frame by attaching pressure-treated lumber to the foundation supports. This will create the base for your shed floor. Use appropriate fasteners and ensure the frame is level and square. Employ a level and measuring tape to guarantee precision and avoid structural issues. The floor joists should be spaced according to building codes, typically 16 inches on center.
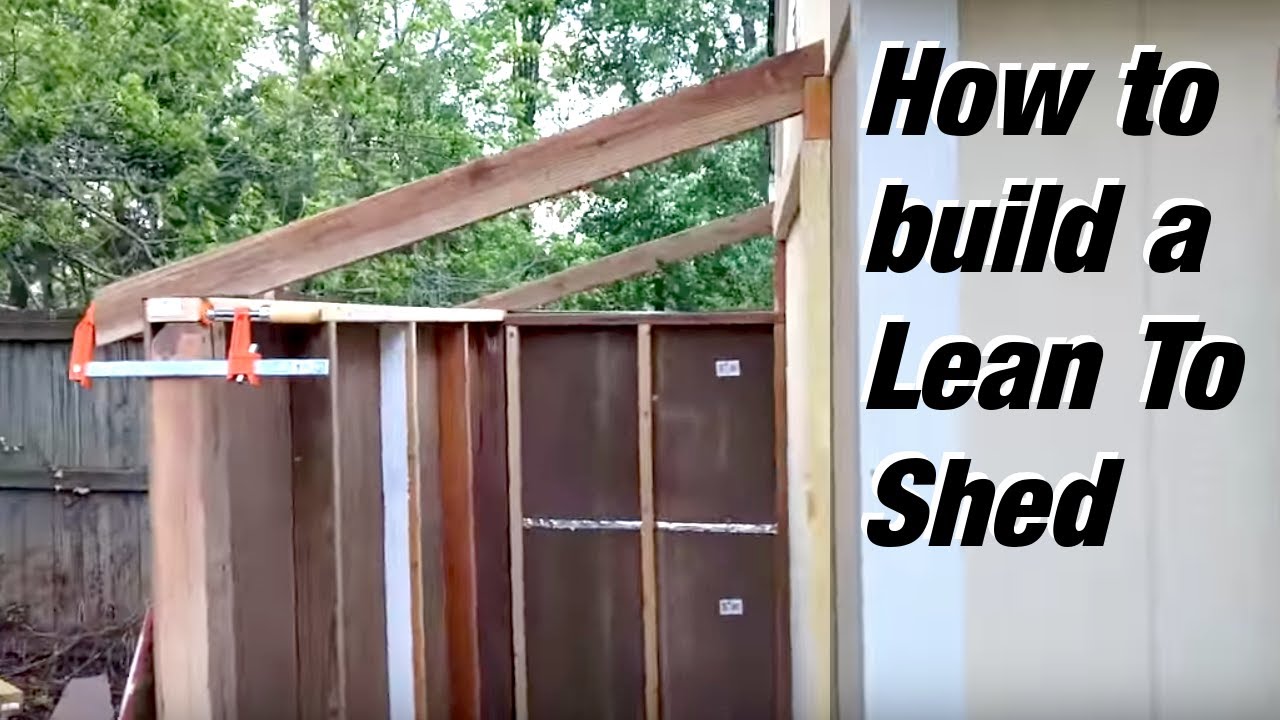
3.2 Wall Framing

Assemble the wall frames using 2x4 lumber. Construct each wall section separately on the ground, ensuring squareness and accurate measurements. Use appropriate fasteners and bracing to maintain stability during assembly. Once the wall frames are complete, carefully raise and secure them onto the floor frame. Use temporary bracing to maintain the wall's vertical position until the roof is installed.

3.3 Loft Framing

Construct the loft framing after the walls are in place. This will typically involve installing beams or joists to support the loft floor. These supporting members should be appropriately sized to handle the anticipated load, and the spacing should adhere to building codes. The loft floor should be strong enough to support the intended weight. Consider using plywood or OSB for the loft floor. Ensure proper connections between loft framing and wall framing to ensure stability.

3.4 Roof Framing

Construct the roof framing using rafters or trusses. The design of the roof will depend on your plans. Install the rafters or trusses securely, ensuring they are properly aligned and spaced. Use appropriate fasteners and bracing to ensure structural integrity. For added stability, consider adding ridge boards and purlins.

Phase 4: Sheathing and Roofing

4.1 Wall Sheathing

Apply plywood sheathing to the exterior walls. Ensure proper alignment and secure fastening. Use appropriate nails or screws for the chosen sheathing material. Pay close attention to sealing any gaps or cracks to prevent air leaks and water damage.

4.2 Roof Sheathing

Apply plywood or OSB sheathing to the roof frame. Ensure proper alignment and secure fastening. Use appropriate nails or screws for the chosen sheathing material. This layer provides a solid base for the roofing material.

4.3 Roofing Installation

Install the chosen roofing material according to the manufacturer's instructions. For asphalt shingles, start at the bottom of the roof and work your way up, overlapping each shingle appropriately. Ensure proper ventilation to prevent moisture buildup.

Phase 5: Finishing Touches

5.1 Exterior Finishing

Apply exterior-grade paint or stain to protect the wood from the elements. This will enhance the shed's appearance and longevity. Choose a suitable finish that protects against moisture and UV damage.

5.2 Door and Window Installation

Install doors and windows, ensuring they are properly aligned and secured. Use appropriate hardware, including hinges, handles, and locks. Caulk around the frames to prevent air leaks and water damage.

5.3 Interior Finishing

Finish the interior of the shed according to your preferences. This may include installing insulation, drywall, or paneling. Consider adding lighting and electrical outlets if needed. Remember to comply with all electrical codes and regulations.

Disclaimer: This guide provides general instructions. Specific techniques and materials may vary depending on individual designs and local building codes. Always consult professional resources and adhere to safety regulations throughout the construction process. Incorrect construction could result in structural failure.

Read More..

Budget-friendly shed plan inspirations

Budget-Friendly Shed Plan Inspirations: Maximizing Functionality and Aesthetics on a Limited Budget

Constructing a shed can significantly enhance property functionality and value. However, the associated costs can often be prohibitive. This comprehensive guide explores diverse budget-friendly shed plan inspirations, demonstrating that a functional and aesthetically pleasing structure can be achieved without compromising financial prudence. We will examine design considerations, material selection, and construction techniques to facilitate the creation of a cost-effective shed tailored to individual needs.

Optimizing Shed Design for Budgetary Constraints

The foundation of any successful budget-friendly project lies in meticulous planning. Careful consideration of design elements from the outset can drastically reduce overall expenditure. A well-conceived design minimizes material waste and simplifies the construction process, translating directly into cost savings.

Prioritizing Simplicity in Shed Design

Complex architectural features often inflate costs. Opting for a simple, rectangular shed design eliminates the need for intricate framing and specialized materials. A gable roof, while slightly more complex than a lean-to, offers superior weather protection and is still relatively straightforward to construct. Avoid elaborate trim work or decorative elements that add cost without significantly enhancing functionality.

Minimizing Shed Dimensions

The size of the shed directly impacts material requirements. A thorough assessment of storage needs is crucial to determine the appropriate dimensions. Avoid overestimating space requirements; a smaller, well-organized shed is far more economical than a larger, underutilized structure. Consider utilizing vertical space effectively with shelving units to maximize storage capacity within a compact footprint.

Strategic Material Selection and Sourcing

Material selection is a pivotal factor influencing the overall budget. Careful consideration of material properties, availability, and pricing is essential. Exploring alternative, cost-effective materials without sacrificing quality can significantly reduce expenditure.

Cost-Effective Material Selection for Shed Construction

The choice of materials significantly influences the overall cost. While high-quality materials offer longevity, exploring budget-friendly alternatives can yield significant savings without compromising structural integrity.

Utilizing Recycled and Reclaimed Materials

Employing recycled or reclaimed materials offers significant cost reductions and environmental benefits. Reclaimed lumber, often available at discounted rates from demolition sites or salvage yards, can be an excellent option for framing and cladding. Similarly, repurposed pallets can be creatively utilized for various components, adding a unique aesthetic appeal.

Exploring Affordable Lumber Options

Pressure-treated lumber, while more expensive than untreated lumber, offers superior resistance to rot and insect infestation, justifying the higher cost in the long run. However, for less demanding applications, such as interior shelving or non-load-bearing partitions, untreated lumber can provide a cost-effective alternative. Careful selection and proper treatment with preservatives can enhance the longevity of untreated lumber.

Cost-Effective Roofing Solutions

Roofing material constitutes a substantial portion of the shed's overall cost. Asphalt shingles represent a cost-effective and widely available option. Metal roofing, while initially more expensive, boasts superior durability and longevity, potentially offering long-term cost savings. Consider the climate and anticipated lifespan when making this decision. Proper installation is crucial regardless of the chosen material.

Construction Techniques for Budgetary Efficiency

Employing efficient construction techniques can significantly reduce labor costs and material waste. Careful planning and execution can minimize errors, saving both time and money.

DIY Construction: Embracing Self-Sufficiency

Undertaking the construction process independently can significantly reduce labor costs. While requiring time and effort, DIY construction provides a sense of accomplishment and allows for greater control over material selection and construction quality. However, it is crucial to possess adequate construction skills or seek assistance from experienced individuals for complex tasks.

Utilizing Simple Construction Methods

Simplicity in construction methods directly translates to cost savings. Opt for straightforward framing techniques and avoid overly complex joinery. Simple, readily available fasteners can significantly reduce costs compared to specialized hardware. Prioritize functionality over intricate design details.

Minimizing Material Waste

Accurate planning and precise measurements are critical to minimize material waste. Create detailed cutting lists and purchase materials only as needed. Consider using offcuts for smaller components, such as shelving supports or trim pieces. Proper storage and handling of materials further minimize wastage.

Aesthetic Considerations on a Budget

While prioritizing budget constraints, aesthetic appeal should not be neglected. Cost-effective enhancements can significantly improve the shed's visual appearance without increasing expenses significantly.

Utilizing Paint and Stain Strategically

A fresh coat of paint or stain can dramatically improve the shed's visual appeal. Choose durable and weather-resistant options to protect the structure and enhance its aesthetic quality. Consider using leftover paint or stain from other projects to further reduce costs.

Landscaping to Enhance Curb Appeal

Strategic landscaping can significantly enhance the shed's overall appearance. Planting flowering shrubs or vines around the shed can create a visually appealing backdrop. Consider using readily available, low-maintenance plants to minimize ongoing expenses.

Conclusion: Realizing Cost-Effective Shed Construction

Constructing a budget-friendly shed requires careful planning, strategic material selection, and efficient construction techniques. By prioritizing simplicity in design, utilizing cost-effective materials, and employing DIY construction methods, one can create a functional and aesthetically pleasing shed without compromising financial prudence. Remember, meticulous planning and attention to detail are key to maximizing value and minimizing expenditure throughout the entire process. With careful consideration of the aforementioned strategies, the dream of a functional and affordable shed becomes a readily attainable reality.

Read More..

Basic shed design for new builders

Building Your First Shed: A Beginner's Guide

So, you're thinking about building a shed? Awesome! It's a fantastic project that lets you learn some valuable DIY skills, customize your outdoor space, and finally get all that garden clutter organized. But where do you even begin? Don't worry, I've been there. This guide will walk you through the basics of shed construction in a way that's easy to understand, even if you've never picked up a hammer before (or maybe you have and are a little rusty!).

Planning Your Shed: Before You Even Grab a Tool

Before you rush out and buy lumber, let's get organized. Proper planning is key to a successful shed-building experience. Trust me, I learned that the hard way!

Size and Purpose

First things first: what size shed do you need? Think about what you'll be storing. A small 4x6 shed might be perfect for garden tools, while a larger 8x10 or even 10x12 might be necessary for lawn mowers, bicycles, and all sorts of other goodies. Consider the space you have available in your yard as well. You'll need enough room to build the shed and still have access to it afterwards. Don't forget to check your local building codes â€" some areas have restrictions on shed size.

Location, Location, Location!

Where will your shed live? Choose a level spot that's relatively easy to access. You'll want to consider proximity to power sources if you plan on using electricity in your shed (more on that later). Also, think about drainage â€" you don't want your shed sitting in a puddle after a rainstorm. Check for any underground utilities before you start digging!

Materials and Budget

This is where it gets fun (and potentially expensive!). You have choices to make: pressure-treated lumber for durability, different types of roofing materials (metal, asphalt shingles, etc.), and even the type of siding you want. Creating a detailed materials list will help you estimate costs accurately and prevent last-minute trips to the hardware store. Consider setting a realistic budget and sticking to it as much as possible. There's always room for upgrades later, but starting with a solid plan will make life much easier.

Building Your Shed: The Foundation

A strong foundation is essential for a long-lasting shed. You have a few options here:

Concrete Slab:

The most durable, but also the most expensive and labor-intensive. Requires pouring concrete, which needs time to cure properly. Best for heavier sheds and those in areas with frost heaving.

Gravel Base:

A simpler and more affordable option. Involves digging a base, adding gravel for drainage, compacting the gravel, and leveling it. Good for lighter sheds in well-drained areas.

Pier Blocks:

A compromise between the two above. Involves setting concrete blocks or piers into the ground and then securing the shed's frame onto them. A good choice for sheds on slightly uneven ground.

Framing the Shed: The Structure

Once your foundation is set, it's time to build the frame. This is where your carpentry skills (or willingness to learn them!) will come into play. You'll need lumber, typically pressure-treated, to construct the walls, floor, and roof. This usually involves cutting lumber to the right lengths, assembling the walls, and then erecting them on the foundation. Accurate measurements are crucial at this stage!

Floor Framing:

Start with the floor. This will usually involve constructing a frame out of lumber and then adding plywood or OSB sheathing for the floor surface. Make sure the floor is perfectly level before moving on.

Wall Framing:

Next, build the walls, typically using a stud framing method (think of the basic structure of a house wall). This involves vertical studs spaced evenly apart, secured to top and bottom plates. Remember to use proper bracing for stability. You'll also need to cut openings for doors and windows.

Roof Framing:

The roof is often the most challenging part. You'll need to choose a roof design (gable, shed, hip, etc.) and build the necessary rafters or trusses to support the roofing material. Again, accurate measurements and proper bracing are key.

Sheathing, Siding, and Roofing

With the frame complete, it's time to add the exterior coverings. This will involve:

Sheathing:

Adding plywood or OSB sheathing over the walls and roof framing provides a solid surface for the siding and roofing. It also helps to strengthen the structure. This is a good time to add any additional insulation you’d like.

Siding:

Choose your siding material (vinyl, wood, metal, etc.) and install it according to the manufacturer's instructions. This is where you can add some personality to your shed!

Roofing:

Install your chosen roofing material (shingles, metal, etc.). This is usually a more involved process that requires attention to detail to ensure watertightness. Don't forget proper ventilation to prevent moisture buildup.

Finishing Touches

Almost there! Once the exterior is complete, it's time for the finishing touches:

  • Install doors and windows.
  • Add trim and molding.
  • Paint or stain your shed.
  • Install any interior shelving or features.

And that's it! You've built your very own shed. Give yourself a pat on the back â€" you earned it!

Frequently Asked Questions

Here are some commonly asked questions about shed building:

  • Q: Do I need a building permit? A: This depends on your local building codes. Check with your local authorities before you start building. Failure to obtain the necessary permits can result in fines or even having to demolish your shed.
  • Q: How long does it take to build a shed? A: This depends on the size and complexity of the shed, as well as your experience. A small, simple shed might take a weekend, while a larger, more complex one could take several weeks or even longer.
  • Q: What tools do I need? A: You'll need basic carpentry tools, including a saw, hammer, drill, level, measuring tape, and safety glasses. More specialized tools might be needed depending on the design and materials.
  • Q: Can I build a shed by myself? A: You can, but it's often easier and safer to have a helper. Lifting heavy lumber and working at heights can be challenging for one person.
  • Q: How much does it cost to build a shed? A: Costs vary greatly depending on size, materials, and complexity. Expect to spend anywhere from a few hundred to several thousand dollars.
  • Q: What kind of wood should I use? A: Pressure-treated lumber is a good choice for the frame, as it's resistant to rot and insects. For sheathing, you can use plywood or OSB.

Remember, building a shed is a rewarding experience. Don't be afraid to ask for help if you need it, and most importantly, have fun! Good luck!

Read More..

Building a Lean-To Shed That’s as Affordable as It Is Functional

Building a Lean-To Shed That’s as Affordable as It Is Functional

Building a Lean-To Shed on a Budget: A Practical Guide

So, you're dreaming of a lean-to shed â€" that extra space for tools, bikes, or maybe just a quiet spot to escape the chaos? But the thought of the cost is giving you a headache? Don't worry, you're not alone! Building a lean-to shed doesn't have to break the bank. With a little planning and some DIY elbow grease, you can create a functional and affordable addition to your property. This guide will walk you through the process, focusing on cost-effective strategies every step of the way.

Planning Your Lean-To Shed: The Foundation of Success

Before you even think about hammering a nail, you need a plan. This is where you’ll save yourself time, money, and potential headaches down the line. Seriously, don't skip this part!

Determining Size and Location:

How much space do you *really* need? A smaller shed is cheaper and easier to build. Measure the area you’re considering and sketch it out. Think about access â€" will you need a wide enough opening for larger items? Consider the sun exposure â€" do you need shade or sunlight? And most importantly, check local building codes and regulations before you even start digging!

Choosing Your Materials:

This is where you can really make or break your budget. Recycled or reclaimed materials are your best friend. Check online classifieds, salvage yards, or even ask neighbours if they have any lumber or roofing they’re getting rid of. You might be surprised at what you can find! If you need to buy new, consider pressure-treated lumber for the base and framing â€" it’s more expensive upfront, but it’ll last longer and save you money in the long run. For roofing, corrugated metal is durable, relatively inexpensive, and easy to work with.

Creating a Detailed Budget:

List every single material you'll need, research prices at your local hardware stores, and factor in any tools you might need to rent. Don't forget to add a buffer for unexpected costs â€" things always pop up! Having a clear budget will keep you on track and prevent overspending.

Construction: Building Your Lean-To Shed

Now for the fun part (well, maybe)! Remember, safety first! Wear safety glasses, work gloves, and sturdy boots. If you’re not comfortable with any aspect of the construction, don't hesitate to ask for help or consult a professional.

Building the Foundation:

A simple concrete slab is ideal, but you can also create a gravel base. For a gravel base, level the ground, lay down landscape fabric to prevent weeds, and then add a layer of compacted gravel. This is a much cheaper option than concrete but might not be as durable.

Framing the Walls and Roof:

This step requires some basic carpentry skills. Cut and assemble the frame according to your plan. Ensure everything is square and level using a level and speed square. Remember, accurate measurements are crucial for a stable structure. Don't rush this part!

Installing the Roofing:

Attaching the roofing material is fairly straightforward, especially with corrugated metal. Make sure to overlap the sheets correctly to prevent leaks. Use appropriate fasteners and seal any gaps with roofing sealant to ensure a watertight seal. Consider adding a small overhang to protect the walls from rain.

Adding the Finishing Touches:

Once the main structure is complete, you can add finishing touches like a simple door, a window for ventilation, or even some shelving. These are optional additions, but they can enhance the functionality and appearance of your shed.

Saving Money During Construction

Here are some additional tips to keep your costs down:

  • Borrow tools from friends or family instead of renting or buying them.
  • Shop around for materials and compare prices at different suppliers.
  • Consider using salvaged lumber for non-structural parts like shelving.
  • Enlist the help of friends or family to reduce labor costs.
  • Do the work yourself! This is the biggest cost saver of all.

Building a lean-to shed is a rewarding project that can greatly enhance your property without emptying your wallet. By carefully planning, sourcing materials wisely, and prioritizing safety, you can create a functional and affordable storage solution that meets your needs.

Commonly Asked Questions

Here are some questions people frequently ask about building lean-to sheds:

Q: Do I need a building permit for a lean-to shed?

A: This depends entirely on your local building codes. Some areas require permits for structures of any size, while others have size limits. Always check with your local authorities before starting construction.

Q: How long does it take to build a lean-to shed?

A: The time it takes varies depending on the size and complexity of the project. A simple lean-to can be built in a weekend, while a more elaborate design might take several days or even weeks.

Q: What’s the best type of wood to use?

A: Pressure-treated lumber is a great choice for the frame as it resists rot and insects. For less critical parts, you could consider using other less expensive lumber, but always ensure it's properly treated for outdoor use.

Q: Can I build a lean-to shed against my house?

A: Yes, you can, but be sure to check your local building codes and ensure proper drainage to avoid any moisture problems for your house.

Q: What if I don’t have any carpentry skills?

A: Start with a simple design, and don't be afraid to ask for help from friends or family who are more experienced. There are also plenty of online resources and videos that can guide you through each step of the process. Consider starting with a smaller project to gain confidence before tackling a larger one.

Remember, even a small lean-to shed can significantly improve your property. With careful planning and execution, you can build a functional and affordable structure that will last for years to come. Happy building!

Read More..

Create a Pallet Shed DIY: Simple Steps for a Quick Backyard Build

Create a Pallet Shed DIY: Simple Steps for a Quick Backyard Build

Pallet Shed DIY: Simple Steps for a Quick Backyard Build

Tired of clutter overflowing your garage? Dreaming of a tidy backyard but lacking the budget for a fancy shed? This DIY project shows you how to build a charming and functional pallet shed in a weekend, saving you money and adding character to your outdoor space. Using reclaimed pallets, this build is environmentally friendly and surprisingly simple, even for novice DIYers. Get ready to transform your backyard storage with this step-by-step guide!

Planning Your Pallet Shed

Before you dive into the exciting part of building, careful planning ensures a successful project. First, determine the desired dimensions of your shed. Consider the size of your yard and the amount of storage you need. Sketch a simple plan, noting the placement of doors and any windows you'd like to include. Remember to check your local building codes for any restrictions on shed size and placement. Next, source your pallets. Look for sturdy pallets in good condition, free of rot or significant damage. Inspect each pallet carefully before using it to ensure it's structurally sound. You'll need to assess how many you require based on your plan's dimensions.

Gathering Your Supplies

Once you have your pallets, gather the necessary supplies. You'll need:

  • Reclaimed pallets: The number will depend on your shed's size.
  • Gloves and safety glasses: Protect yourself from splinters and debris.
  • Hammer and nails or a cordless drill and screws: Secure the pallets together.
  • Measuring tape and level: Ensure accurate measurements and a level structure.
  • Saw (optional): For cutting pallets to size if needed.
  • Wood sealant or paint (optional): Protect your shed from the elements and add a personal touch.
  • Hinges and a latch for the door: Secure and protect your belongings.

Constructing the Shed Frame

Start by assembling the floor. Lay your pallets side-by-side, creating the base of your shed. Secure them together using nails or screws. For added strength, you might consider adding additional support beams underneath. Now, build the walls. Stand the pallets vertically, attaching them to the floor frame using nails or screws. Ensure the pallets are level and flush with each other for a clean, professional look. You can use longer screws to attach multiple layers of pallets if required. For strength, create a sturdy frame using 4x4 lumber along the bottom and top of the walls before placing the pallets.

Adding the Roof and Finishing Touches

Construct the roof using the same pallet method as the walls. You can either create a gable or a simple flat roof depending on your preference. Secure the roof frame to the top of the walls using nails or screws, ensuring it's properly supported and waterproof. If you opt for a flat roof, ensure sufficient slope for water runoff. Once the roof is complete, you can apply a waterproof sealant or tar to prevent water damage. Finally, add a door using a section of pallets and hinges, and install a latch for security. Consider adding a simple window for ventilation if desired. Finish by sanding down any rough edges and applying a wood sealant or paint to enhance the appearance and protect the wood from the elements. Add your personal touch with a unique color or design!

Enjoy Your New Pallet Shed!

Congratulations! You've successfully built your very own pallet shed. This quick and easy project offers a great way to add extra storage to your backyard while showcasing your DIY skills and creativity. Remember to always prioritize safety and take your time with each step for a stable and lasting structure. Now, enjoy your new, organized, and charming backyard sanctuary!

Read More..

Building a Lean-To Shed: A DIY Project for Maximum Impact

Building a Lean-To Shed: A DIY Project for Maximum Impact

Building a Lean-To Shed: A DIY Project for Maximum Impact

Constructing a lean-to shed presents a rewarding DIY project, offering significant storage solutions and aesthetic enhancements to any property. This comprehensive guide details the planning, materials acquisition, and construction phases, enabling even novice DIY enthusiasts to successfully complete this undertaking. While demanding time and effort, the resultâ€"a functional and visually appealing addition to your propertyâ€"justifies the investment.

Phase 1: Planning and Design

Meticulous planning forms the cornerstone of any successful construction project. Failing to adequately plan can lead to costly errors, material waste, and ultimately, a subpar outcome. This phase necessitates careful consideration of several critical aspects.

Site Selection and Assessment

The chosen location significantly impacts both the practicality and aesthetics of your lean-to shed. Factors to consider include:

  • Proximity to existing structures: Ensure sufficient space for construction and future access. Consider proximity to power sources if electrical fittings are planned.
  • Ground conditions: Evaluate the soil type to determine the need for a concrete foundation or alternative groundworks. Poor drainage can lead to foundation instability.
  • Sunlight and shade: Assess the amount of sunlight the shed will receive throughout the day. Excessive sunlight may necessitate ventilation or insulation considerations.
  • Local regulations and building codes: Verify compliance with local building regulations, zoning ordinances, and any homeowner's association guidelines. Obtaining necessary permits is crucial to avoid potential legal issues.

Dimensions and Design Considerations

Determine the desired dimensions of your lean-to shed based on your storage needs. Consider both the length and width, ensuring sufficient interior space while maintaining proportionality to the existing structure it will be attached to. The height should be sufficient to allow comfortable access and storage. Detailed sketches are highly recommended, incorporating specific dimensions and material specifications.

Consider the following design elements:

  • Roof pitch: The angle of the roof affects water runoff and overall aesthetics. A steeper pitch is better for areas with heavy snowfall.
  • Door placement and size: Ensure easy access to the shed's interior. Consider the size and location of the door in relation to the available space.
  • Window placement: If desired, windows can provide natural light and ventilation. Their placement should maximize natural light while minimizing heat gain in hot climates.
  • Material selection: Choose materials that are durable, weather-resistant, and aesthetically pleasing. Common choices include pressure-treated lumber, plywood, and metal roofing.

Phase 2: Materials Acquisition and Preparation

Accurate material estimation is paramount to avoid unnecessary expenses and project delays. Create a detailed list of materials required, including lumber, fasteners, roofing materials, and any additional components such as windows or doors. Consider purchasing materials with a small margin of error to account for potential waste or unforeseen circumstances.

Lumber Selection and Treatment

Pressure-treated lumber is highly recommended for its resistance to rot, decay, and insect infestation, especially for components in direct contact with the ground. Specify the dimensions of required lumber accurately, ensuring appropriate strength and durability for the structure. Check for any defects before purchase and consider pre-cutting longer pieces to manageable lengths to simplify construction.

Roofing Material Selection

The choice of roofing material impacts longevity, cost, and aesthetics. Common options include asphalt shingles, metal roofing, and polycarbonate sheets. Asphalt shingles offer a cost-effective solution, while metal roofing provides superior durability and longevity. Polycarbonate sheets provide excellent natural light transmission.

Phase 3: Construction

The construction phase demands careful adherence to the pre-determined plan. Proceed methodically, ensuring accurate measurements and secure fastening at every stage. Consider using appropriate safety equipment throughout the entire process.

Foundation Preparation

The foundation type depends on ground conditions and local regulations. A concrete slab foundation provides a stable and durable base, while alternative options include gravel pads or pier footings. Ensure the foundation is level and appropriately sized to support the shed's weight.

Framing and Wall Construction

Construct the frame according to your design specifications, ensuring accurate measurements and square corners. Use appropriate fasteners to secure the framing members. Sheathe the walls with plywood or other suitable material, ensuring proper alignment and fastening. Consider adding insulation for better climate control.

Roof Construction

Construct the roof framing, ensuring proper rafter spacing and support. Install the chosen roofing material, ensuring proper overlap and sealing to prevent leaks. Ensure sufficient overhang to protect the walls from water damage. Consider adding a ridge vent for improved ventilation.

Finishing Touches

Install the door, windows (if applicable), and any additional features. Apply a protective sealant or paint to the exterior to improve weather resistance and aesthetics. Clean up the construction site and dispose of all debris responsibly.

Phase 4: Post-Construction Considerations

After completion, it's crucial to conduct a thorough inspection, ensuring all components are securely fastened, and the structure is stable and watertight. Regularly inspect the shed for any signs of damage or deterioration, addressing issues promptly to maintain its longevity.

Maintenance and Upkeep

Regular maintenance is key to prolonging the lifespan of your lean-to shed. This includes periodic inspections for any signs of damage or decay, addressing any issues promptly. Regular cleaning and applying protective coatings will help prevent deterioration and preserve its appearance.

Building a lean-to shed is a challenging yet rewarding endeavor. Through careful planning, diligent material acquisition, and meticulous construction, you can create a valuable and aesthetically pleasing addition to your property, maximizing its impact and providing a functional storage solution for years to come.

Read More..

Step-by-Step Guide to Lean-To Shed DIY for a Quick Backyard Build

Step-by-Step Guide to Lean-To Shed DIY for a Quick Backyard Build

Constructing a Lean-To Shed: A Comprehensive DIY Guide

This guide provides a detailed, step-by-step approach to constructing a lean-to shed, ideal for the DIY enthusiast seeking a functional and aesthetically pleasing addition to their backyard. While demanding a commitment to precision and safety, this project is achievable with readily available tools and materials. We prioritize a clear understanding of each stage, emphasizing best practices to ensure structural integrity and longevity.

Phase 1: Planning and Preparation

Meticulous planning forms the cornerstone of any successful construction project. A poorly conceived design can lead to significant challenges and compromises in the final outcome. This phase focuses on establishing the shed's dimensions, securing necessary permits, and gathering the required materials and tools.

1.1 Defining Dimensions and Design

The first step involves determining the desired dimensions of your lean-to shed. Consider the intended use, available space, and local building regulations. Typical lean-to sheds range from 6ft to 12ft in width and 8ft to 12ft in depth. Sketch a detailed plan, including measurements for the walls, roof, and door. Specify the materials you intend to use, such as pressure-treated lumber for the frame and plywood for the sheathing.

1.2 Obtaining Necessary Permits

Before commencing construction, verify whether you require a building permit from your local authority. Building codes vary significantly depending on your location, and neglecting this crucial step can result in fines or even demolition orders. Contact your local building department to clarify permit requirements and submit the necessary documentation, including your detailed design plan.

1.3 Gathering Materials and Tools

Accurate material estimations are crucial to prevent delays and unnecessary expenses. Refer to your detailed plan and create a comprehensive shopping list. This list should include:

  • Pressure-treated lumber (for framing)
  • Plywood sheathing (for walls and roof)
  • Roofing material (e.g., asphalt shingles, metal roofing)
  • Concrete blocks or pier supports (for foundation)
  • Nails, screws, and other fasteners
  • Exterior paint or sealant
  • Door and window frames (if applicable)

In addition to materials, assemble the necessary tools, ensuring they are in good working condition:

  • Measuring tape
  • Level
  • Post-hole digger or auger (for pier supports)
  • Shovel
  • Circular saw
  • Drill
  • Hammer
  • Safety glasses and gloves

Phase 2: Foundation and Framing

A stable foundation is paramount for a structurally sound lean-to shed. This phase details the construction of the foundation and the framework that will support the walls and roof.

2.1 Preparing the Foundation

The foundation type depends on the size and intended use of the shed. For smaller lean-to sheds, concrete blocks or pier supports provide a simple and effective solution. Level the ground, excavate holes for the supports, and set them in concrete. Ensure the supports are level and plumb using a level and plumb bob. For larger or heavier sheds, a more substantial foundation, such as a concrete slab, may be necessary.

2.2 Framing the Walls

Construct the wall frames using pressure-treated lumber. Cut the lumber to the required lengths based on your design. Assemble the frames using appropriate fasteners, ensuring squareness and plumbness at each stage. Use a level and a square to verify accuracy. For added stability, consider bracing the frames during construction.

2.3 Framing the Roof

The roof framing requires careful attention to detail to ensure proper slope and water runoff. The lean-to design utilizes a single sloped roof. Construct the rafters, ensuring they are evenly spaced and securely fastened to the supporting wall and the main structure. Check for proper slope and alignment using a level and a speed square.

Phase 3: Sheathing, Roofing, and Finishing

This phase involves enclosing the shed, installing the roofing, and adding the finishing touches.

3.1 Sheathing the Walls and Roof

Attach plywood sheathing to the framed walls and roof. Ensure proper overlap and secure fastening to prevent movement. Consider using weather-resistant plywood for enhanced durability. Stagger the seams of the plywood sheets to increase structural strength.

3.2 Installing the Roofing Material

Install the chosen roofing material according to the manufacturer's instructions. Asphalt shingles are a common and relatively inexpensive option. Metal roofing provides enhanced durability and longevity. Ensure proper overlapping and secure fastening to prevent leaks. Seal any exposed edges or joints to ensure watertightness.

3.3 Finishing Touches

Install doors and windows (if applicable) and apply exterior paint or sealant to protect the wood from the elements. Clean up any debris and ensure the surrounding area is safe and tidy. Consider adding features such as shelving or workbenches based on your needs.

Phase 4: Inspection and Maintenance

After completion, conduct a thorough inspection to ensure structural integrity and address any minor imperfections. Regular maintenance is vital to prolong the lifespan of your lean-to shed.

4.1 Final Inspection

Carefully examine all aspects of the structure, checking for any loose fasteners, gaps in the sheathing, or other potential issues. Address any deficiencies before proceeding further. Consider a final walk-through with a friend or family member to gain a fresh perspective.

4.2 Ongoing Maintenance

Regularly inspect the shed for any signs of damage or deterioration. Repair any cracks or gaps in the sheathing or roofing promptly to prevent water damage. Repaint or reseal the exterior every few years to protect the wood from the elements. Keep the area around the shed clear of debris and vegetation to prevent moisture accumulation.

Disclaimer: This guide provides general information and should not be considered a substitute for professional advice. Always consult with relevant professionals and adhere to local building codes and regulations.

Read More..
Powered by Blogger.